Welcome to RVForums.com

  • Register now and join the discussion
  • Friendliest RV Community on the web
  • Modern site for PC's, Phones, Tablets - no 3rd party apps required
  • Ask questions, help others, review campgrounds
  • Get the most out of the RV Lifestyle
  • Invite everyone to RVForums.com and let's have fun
  • Commercial/Vendors welcome

Solar Panel Placement

Welcome to RVForums.com

  • Register now and join the discussion
  • Modern secure site, no 3rd party apps required
  • Invite your friends and let's have fun
  • Commercial/Vendors welcome
  • Friendliest RV community on the web

newmarokie

RVF Supporter
Joined
Oct 8, 2023
Messages
160
Location
southern oklahoma
RV Year
2019
RV Make
newmar
RV Model
Dutch Star 4018
RV Length
40'
Chassis
Freightliner
Engine
450 hp Cummins
TOW/TOAD
3017 Colorado
Fulltimer
No
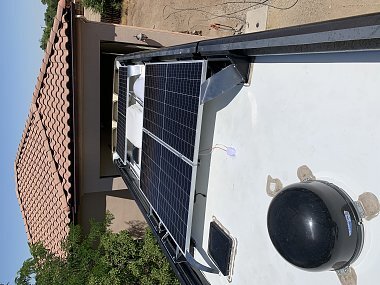
Still kicking around putting solar panels on top of the coach. Has anyone put a panel on the bathroom cathedral top? Is there a reason not to? A 425 watt qcell panel would fit very nicely. As far as I can see, about all panels in the 300 to 425 watt are similar in size. I just don't know if there is a structural reason not to.
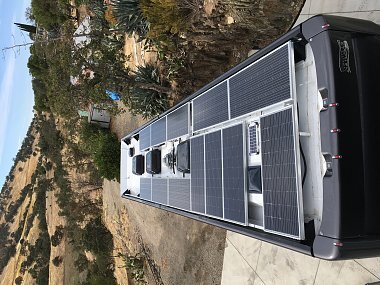
 
I would build a frame out of aluminum angle spanning the width of the coach a little above the roof secured to the bracket structure that holds the side valences. Then you can mount whatever you want without any interference from the roof contours and/or existing equipment, and without any penetrations to it. I’ve seen this done a few times and it seems like a very good way to mount panels.
 
That's a good plan. Thanks
 
When placing panels observe the following:

1. Panels need breathing room! Many say a couple inches is fine but I disagree. Consider that sunlight reflects off the roof. When you place a panel on your roof, you replace sunlight,with radiant heat. The more space the better!!!

2. Building a structure one must consider how a branch will react when you miss judge the overhang.

Nothing is perfect. And everything we do is a compromise! That said this is how I protect my trailers structure. The supporting angle was bent at a metal yard. And because I'm not close to 13feet the panels stay in this position.

IMG_20240503_062804.jpg
 
That's a good plan. Thanks
Here are a couple examples. The aluminum sheet pieces in the second photo are “branch guards”. Both of these are home designed using the existing structure to build racks that hold the panels off the roof.
IMG_3271.jpegIMG_3270.jpeg
 
Here are a couple examples. The aluminum sheet pieces in the second photo are “branch guards”. Both of these are home designed using the existing structure to build racks that hold the panels off the roof.
View attachment 23732View attachment 23733
Would you please share some photos of the brackets/structure you made to support the panels? Thanks
 
Would you please share some photos of the brackets/structure you made to support the panels? Thanks
Those are just examples to show how it can be done. I attached my panels directly to my roof with home made mounts made from aluminum angle as I don't have the valance to support a suspended mounting system like those in the pics. If you are not handy with fabrication I would get together with someone who is to ensure you build a safe sturdy mounting system.
 
I've been snooping around over at DIY and am seeing some installs using utility track. That is looking like the best way to install the panel at the back of my coach(when it finally happens). I do have the valances Rich is talking about. I am thinking glue down brackets like you used, Rich on the forward three.
 
I have the side valences too. I would consider putting in the mounts where you can tilt them but I have no ladder and I don't feel like getting my extendable ladder out for 1 or 2 days would be worth it. I think the thing to do would be a section of aluminum angle glued to the roof with 3M tape. I could consider an longer leg(s) on the angle iron to get some elevation and minimize impact of side obstruction. Maybe 6 inch.
 
I have the side valences too. I would consider putting in the mounts where you can tilt them but I have no ladder and I don't feel like getting my extendable ladder out for 1 or 2 days would be worth it. I think the thing to do would be a section of aluminum angle glued to the roof with 3M tape. I could consider an longer leg(s) on the angle iron to get some elevation and minimize impact of side obstruction. Maybe 6 inch.
So Larry, have you ever seen the results of delamination? I saw an older MH where the entire roof needed replaced because of such a condition. We just had a discussion about this subject! A new material (well not so new)! Anyhow, as an argument,or sales tactic, uses a pull test to convince people the product is Worthy!

We know that a little water damage and a pull test would be catastrophic, when Wood underlayment is used.

Should you have read any of my Posts, you know I am sometimes a little graphic,and I wanted to bring home a point!

Sounds to me like you want to assemble your very own pull test!!! You can use 3M's UHB tape to glue the structure to the roof skin,and it should be fine, but how will you secure the skin to the structure? With modern silicone you can make a durable seal if you put holes in the roof!!!

Yes,in My book you need to connect that mount to the MH structure!!! After all anything that flys off your MH, the damage done is your responsibility!!!
 

Latest resources

Back
Top